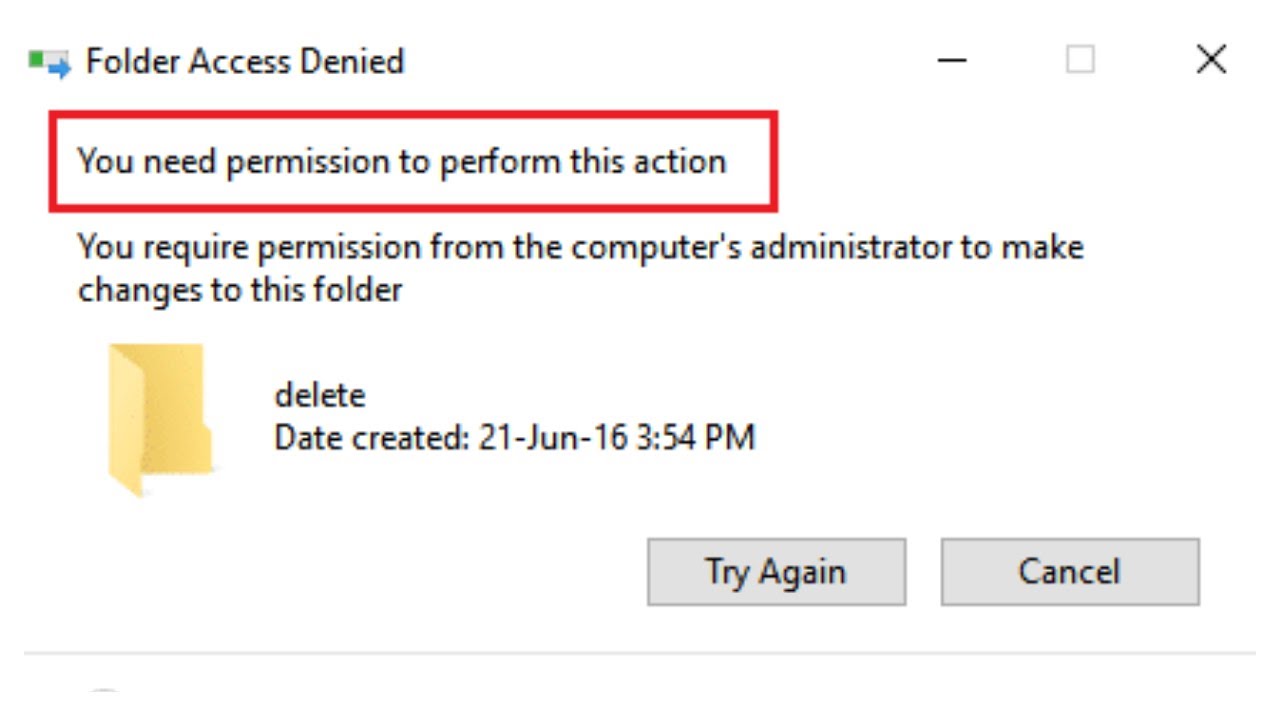
As always, Microsoft wants to ensure that your files never get into the wrong hands. However, sometimes this protection goes overboard and gives you the “You need permission to perform this action” error when trying to delete a folder, run an application, or open a file.
The error doesn’t appear to have any distinct cause, and you’re in despair trying to figure out what’s wrong with the system. Worry no more, we’ve brought you the most efficient methods to fix the “You need permission to perform this action” error. Continue reading to find out its causes, and how you can fix it within minutes.
Jump to Section:
- What Cause "You need permission to perform this action" error?
- How to fix “You need permission to perform this action”
- Disable any third-party antivirus
- Scan your device with Windows Defender
- Create a .bat file to take ownership
- Change permissions without taking ownership
- Run a System File Checker (SFC) scan
- Conclusion
What Cause the "You need permission to perform this action" error?
While a direct cause for this error can’t be identified, users seem to notice that it’s most likely your permissions are getting messed up. Permissions allow you to set up user accounts that can’t perform certain actions, increasing the security of a shared computer.
When these permissions get modified in the wrong way, it may lead to errors appearing, such as the one this article is about. It may cause devastation, as even with an administrator account, you won’t be able to create new files and folders or even modify or delete existing ones.
Another possible cause could be the use of certain third-party applications or malware infection.
No matter what caused your error, we’re here to help you fix it within minutes. Continue reading the next section to learn how.
How to fix “You need permission to perform this action.”
Now that we established the possible reason for your error, it's time to get it fixed. We’ve listed the most useful methods of going about fixing this annoying issue, ensuring that you can get full control over your system as soon as possible.
Note: Some of these methods require you to use an administrator account on your device. This means that the account is able to perform various tasks that may change system settings, which are often required to restore your taskbar.
Don’t know how to change your account to have administrator permissions? Want to create a separate administrator user for purposes like this? We recommend watching “Making a user an administrator on a Windows 10 system” by StormWind Studios to learn how you can make admin users like a pro.
Let’s start troubleshooting the “You need permission to perform this action” error!
Disable any third-party antivirus
As we mentioned above, a third-party application may cause this error on your system. Windows 10 users report that many antivirus applications are able to cause this error. The best and safest way of testing this is by temporarily disabling your antivirus and seeing if the error still occurs.
Note: Make sure you turn on Windows Defender while having your third-party antivirus disabled. Defender is a native Windows 10 solution for malware protection, capable of giving you the necessary protection when using your PC.
Here’s how you can temporarily disable an antivirus application.
- Open the Task Manager using one of the following ways:
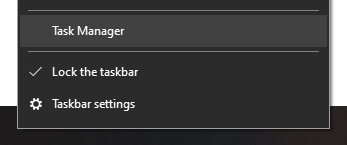
- Right-click on your taskbar and choose Task Manager from the context menu.
- Press the Ctrl + Alt + Del keys on your keyboard and wait for the security options screen to show up. Then, select Task Manager.
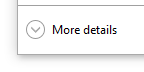
2. If your Task Manager launched in the compact view, click on the More details option seen in the bottom left of the window.
3. Switch to the Startup tab at the top of the Task Manager window. Here, you can see all of the applications that start along with your computer at launch.
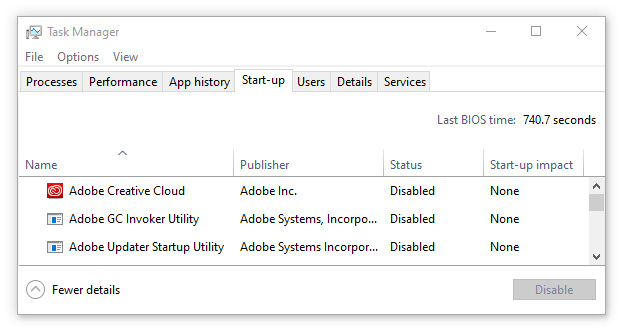
4. Select your third-party antivirus application, then click on the Disable button in the bottom right of the window. The status of the application should change to Disabled.
5. Repeat this for every third-party antivirus software installed on your computer, then restart your device.
After completing these steps, your computer will launch without the third-party antivirus software, giving you the ability to check if your issue is resolved.
If you can modify, delete, and create folders/files again, it’s most likely that the antivirus app you’ve been using messed up your permissions. We recommend looking for a different application or contacting customer support.
Scan your device with Windows Defender
Staying on the antivirus track, it’s possible that the device has been infected with malware which caused the permission error to appear. To test if this is the case, use the integrated Windows Defender to scan your device and remove any viruses.
- Click on the Windows icon located in the bottom left corner of your screen. This will open up Windows 10’s tiled Start menu.
2. Click on Settings, indicated by a gear icon. Keyboard pros can also use the Windows + I shortcut to launch the application faster.

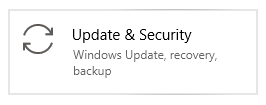
3. When the Settings window finishes loading, you’ll see multiple menu options. Click on Update & Security.
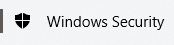
4. Using the menu on the left side, select the Windows Security page.
5. Click on Virus & threat protection. This will open up a new window.

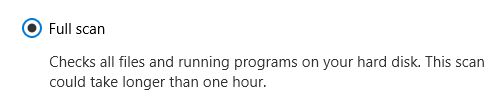
6. Click on the Scan options link, then select a Full scan. Although this scan may take longer, it’s recommended to run it as opposed to a Quick scan. Malware often tries to hide from you, and a full system scan will most likely find it.
7. Wait for the scan to finish and take the appropriate action against any threats found.
Create a .bat file to take ownership
You can try attempting to take back the ownership of a folder using a .bat file. The process of creating one is simple, all you have to do is follow the next few steps.
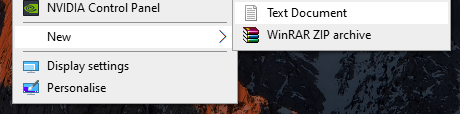
- Right-click on an empty space on your Desktop, then select New, and create a Text document.
2. Name it Fix.txt and use any text editor to open it.
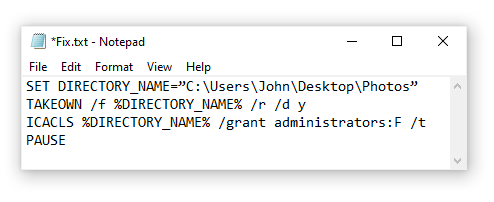
3. Copy-paste in the following lines:
SET DIRECTORY_NAME=”DIRECTORY”
TAKEOWN /f %DIRECTORY_NAME% /r /d y
ICACLS %DIRECTORY_NAME% /grant administrators:F /t
PAUSE
4. Replace DIRECTORY with the path to the problematic folder. For example, if you have issues with a folder named Photos on your Desktop, you want to replace it with “C:\Users\your username\Desktop\Photos.”
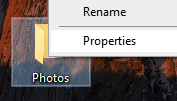
5. Save Fix.txt, then navigate to your desktop and rename it Fix.bat. You’ll get a warning about changing the file extension — simply click on Yes.

6. Right-click on Fix.bat and select Run as administrator.

Check if you can access or delete the folder that was giving you issues.
Change permissions without taking ownership
If you don’t want to change the owner of a file or folder, you can simply give yourself the correct permissions to access it.
Especially when working with sensitive files, passing the ownership back and forth may cause more issues or raise concerns on a shared device. This is why simply giving each user the appropriate permissions is often the better solution.
Here’s how you can change the permissions of a folder or file on Windows 10.
- Right-click on the problematic folder or file, then select Properties from the context menu.
2. Switch to the Security tab found at the top of the Properties window.

3. Click on the Advanced button.

- Check if your user has “Full control” listed under the Access column.
- If you see anything other than “Full control” or don’t see your username in the list at all, click the Add button.
- Click on the Select principal link at the top of the window.
- You’ll see a typeable field titled “Enter the object name to select.” Here, simply type in your local username. Make sure not to misspell anything and note that this is case sensitive.
- Click on the Check names button to validate the username, then click OK.
- Place a checkmark next to Full control. This should automatically mark every action except for “Special permissions”.
If the error was caused by permissions getting mixed up, you might be able to successfully perform the action you were previously trying to do. Give it a try!
Run a System File Checker (SFC) scan
Windows 10 comes with many integrated ways of troubleshooting and finding issues on your device. One of these is the System File Checker, a handy tool that is able to detect and solve a wide variety of system issues.
Here’s how you can run an SFC scan on Windows 10 to identify system issues.
- Press the Windows + R keys on your keyboard to launch the Run utility, then enter “cmd” and press Ctrl + Shift + Enter. This will launch the Command Prompt with administrator permissions.
- Click Yes and enter your password if prompted.
- Enter the following command and press enter: sfc /scannow
- Wait for the scan to finish. This may take a long period of time, depending on your system. Make sure the scan isn’t closed or interrupted, as you will lose progress.
- If any issues are identified, the SFC scanner will attempt to fix them automatically.
Conclusion
We hope you were able to fix your issues with the annoying “You need permission to perform this action” error after completing our steps. If you still have the issue even after trying each method, we recommend resetting Windows 10.
If you’re in need of information about other Microsoft Windows issues, need help with troubleshooting, or want to learn more about your operating system, check out our other articles here.
However, if you’re looking for a software company you can trust for its integrity and honest business practices, look no further than SoftwareKeep. We are a Microsoft Certified Partner and a BBB Accredited Business that cares about bringing our customers a reliable, satisfying experience on the software products they need. We will be with you before, during, and after all the sales.
One more thing
We’re glad you’ve read this article upto here :) Thank you for reading.
If you have a second, please share this article on your socials; someone else may benefit too.
Subscribe to our newsletter and be the first to read our future articles, reviews, and blog post right in your email inbox. We also offer deals, promotions, and updates on our products and share them via email. You won’t miss one.