Microsoft Office is a product family that helps customers complete and automate tedious personal and office-related work.
Office 2010 might be an older version of the Office suite; however, it is still a solid option for getting the job done.
During its time, Office 2010 introduced many welcomed changes to how Microsoft produces Office, such as new interface enhancements making the ribbon interface the default view, extended file format support, co-authoring features that allow users to edit the same document simultaneously as well as the introduction of possibly installing the suite in either 32-bit or 64-bit.
Microsoft released Office 2010 in many different editions, to be precise, there are eight different editions available on the market.
Almost every single component of the suite can also be purchased as a standalone application.
Each of the eight Office 2010 editions differs from the others, as the more costly, higher-end Office 2010 versions include more applications and services than the ones intended for home use by individuals.
One thing in every version and on every application is the same; you need to go through a process to download and install your files properly, which can become quite confusing with so many editions being offered along with the various payment methods, the services included and the many applications you need to know how to install properly onto your device.
If you want to know how to install Office 2010 and which bit version to choose, please read our article for an in-depth guide explaining every part of the process while listing the benefits of using a different bit version as well.
Depending on your Office product and desired bit version, follow our guide to download and install your programs properly without running into any errors that might require precious time and effort to troubleshoot.
Microsoft Office 2010 System Requirements
Before you begin installing Office 2010, it is important that you review and understand the minimum system requirements for the application suite.
Without these requirements being met, you might not be able to enjoy Office 2010 to its fullest, as failing to reach the minimum can make your applications slow and hard to use.
These are the minimum system requirements for two of the Office 2010 suites.
If you own a different suite, these requirements are generally a good standpoint to determine if your device can handle it or not, as the core applications in each suite require the same conditions to be met.
Microsoft Office Home and Student 2010 System Requirements
|
Processor |
|
|
Memory |
|
|
Hard disk |
|
|
Display |
|
|
Operating system |
|
|
Graphics |
|
|
Additional requirements |
|
|
Other |
|
Microsoft Office Home and Student 2010 System Requirements
|
Processor |
|
|
Memory |
|
|
Hard disk |
|
|
Display |
|
|
Operating system |
|
|
Graphics |
|
|
Additional requirements |
|
|
Other |
|
How to Check what bit version of Windows you're running
If you have not made your mind up about which bit version of Office 2010 you should use, we will list the reasons to use either of them; though the 64-bit version is more recommended, there might be instances where the 32-bit version is more appealing for you.
Choosing this is important, as the installation is different for both versions.
Windows 10
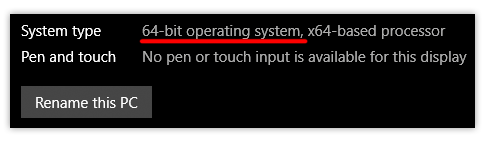
Right-click on the Windows icon in the bottom left corner of your screen, select System and check your System type to identify the correct version of your system.
Windows 7
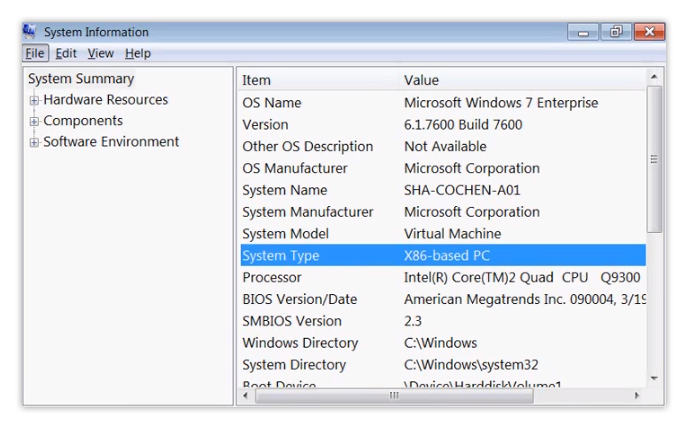
Click the Start button (Windows icon) in the bottom left of your screen, and type in msinfo32.exe in the search box, and click on the result.
This will bring up the System Information window, where next to System Type you can determine whether or not you have a 32-bit system (X86-based PC) or a 64-bit system (x64-based PC).
Windows Vista
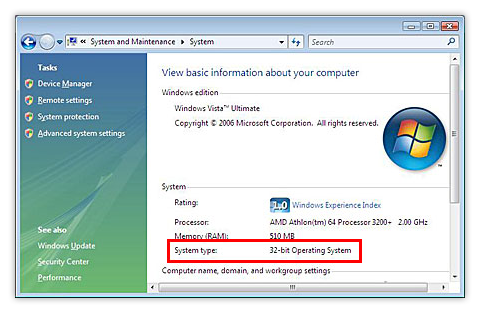
Click on the Start menu (Windows icon) located in the bottom left of your screen, and choose Control Panel from the menu on the right.
Click System and Maintenance, then choose System. Next to System type, you should be able to see whether or not you are running a 32-bit or 64-bit Windows.
Windows XP
Click the Start menu, and right-click on My Computer, then click the Properties menu option. If "x64 Edition" is listed under System, you are running the 64-bit version, and on the other hand, if it's not there, your Windows XP system is running the 32-bit version.
Why You Should Install Office 2010 64-bit
Note: If you have a 64-bit Windows, you can install both the 32-bit and 64-bit versions of Office with ease.
If you work with large files or large sets of data and your computer is running the 64-bit version of Windows, this bit version is the right choice. You should also choose the 64-bit version when:
- You are working with huge sets of data, such as enterprise-scale Office Excel workbooks with many calculations, pivot tables, connections to external databases.
- You are using features such as Power Pivot, 3D Map, Power View, or Get & Transform.
- You are working with large pictures, videos or animations in PowerPoint.
- You are working with files over 2 GB in Project, especially if your project includes many sub-projects.
- You are working on developing in-house Office add-ins or document-level customization.
- Your organization requires the enforcement of Hardware Data Execution Prevention (DEP) for Office apps.
Why You Should Install Office 2010 32-bit
Note: If you have a 32-bit version of Windows, you can only install a 32-bit Office.
In some cases, especially for IT Professionals and developers, choosing the 32-bit version of Office might be the more suitable approach to getting things done when:
- You utilize 32-bit COM Add-ins without a 64-bit alternative.
- You have 32-bit controls without a 64-bit alternative.
- The VBA code you use uses Declare statements.
- You have 32-bit MAPI applications for Outlook.
- You are activating a 32-bit OLE server or a 32-bit OLE object.
- You need 32-bit .mde, .ade and accde Microsoft Access database files.
- You need to use the Legacy Equation Editor or WLL (Word Add-in libraries) files in Word.
- You have an old, embedded media file in a PowerPoint presentation.
How to Install Office 2010 32-bit (Default)
Step 1.
If you have an Office 2010 disk, insert it into your drive. The setup wizard should launch automatically, but if it doesn’t, simply navigate to the disc drive and open the SETUP.exe file.
In case you did not purchase Office 2010 physically, you can download and install Office 2010 by entering your product key.
Step 2.
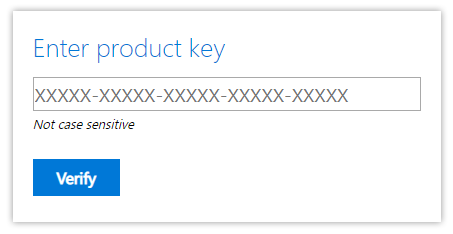
When prompted, enter your product key. Be sure to enter it correctly, as even one incorrect character will end up making your key unrecognizable by the system.
Office 2010 includes a product key that has to be entered, check for a product key. If you bought your copy of Office 2010 for home digitally, check your emails or Microsoft account.
If you bought a retail copy, the product key is usually located inside the disc case on a bright sticker.
Some computers come with Office pre-installed, if yours did, check your documents that came along with your purchase and look for the product key, which is often on a printed on a yellow piece of paper, or check the computer case for a Microsoft branded sticker that should have the product key written on it.
Note: Office 2010 product keys consist of 25 alphanumeric characters and look something like this: XXXXX-XXXXX-XXXXX-XXXXX-XXXXX
Didn’t get a product key? Contact Microsoft or your seller for support.

Once you enter your product key, click Continue.
Step 3.
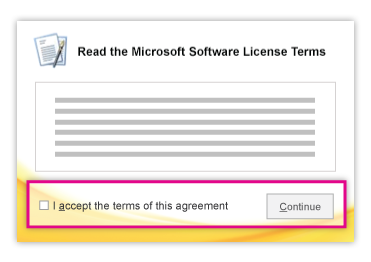
Next, you need to read and agree to the Microsoft Software License Terms. You can simply do this by reading and reviewing the terms, then ticking the box next to I accept the terms of this agreement and simply click Continue.
Step 4.
Follow the on-screen prompts and wait for Office 2010 to finish installing. This might take longer depending on your system; make sure not to turn off your computer or interrupt the installer by closing it, as progress will be lost and you will have to start the installation over. Once the installation is complete, click Close to exit the setup wizard.
Step 5.
Next, you need to activate your product. In the Microsoft Office Activation Wizard, click the option that says I want to activate the software over the Internet and follow the on-screen instructions.
Activating your Office 2010 is what makes you be able to utilize the software to its fullest. If you decided not to activate after installing, you can always activate from any Office 2010 product by navigating to File, Help, then Activate Product Key.
How to Install Office 2010 64-bit
Before you install a 64-bit Office 2010
- You are required to be running a 64-bit version of Windows. If unsure, check what system bit version you are running by following the instructions above.
- If you have a 32-bit version of Office on your computer, you must uninstall it before you can install a 64-bit version of Office 2010.
- Make sure that your third-party Office add-ins which you have installed on your computer are all compatible with the 64-bit version of Office 2010. If you are unsure and can not confirm that the compatibility will work, it is recommended to stay with the 32-bit version of Office 2010 even if you are running a 64-bit system.
Step 1.
Insert your Office 2010 installation disc to your drive.

Step 2.
Click the Start menu located on the bottom left of your screen, then click on Computer and right-click the disc drive which you inserted the Office 2010 installation disc into. Now simply select Open.
Step 3.
Double click the x64 folder from the disc to open its contents, and double click on setup.exe to bring up the setup wizard.
Step 4.
When prompted, enter your product key. Be sure to enter it correctly, as even one incorrect character will end up making your key unrecognizable by the system.
Office 2010 includes a product key that has to be entered, check for a product key. If you bought your copy of Office 2010 for home digitally, check your emails or Microsoft account.
If you bought a retail copy, the product key is usually located inside the disc case on a bright sticker.
Some computers come with Office pre-installed, if yours did, check your documents that came along with your purchase and look for the product key, which is often on a printed on a yellow piece of paper, or check the computer case for a Microsoft branded sticker that should have the product key written on it.
Note: Office 2010 product keys consist of 25 alphanumeric characters and look something like this: XXXXX-XXXXX-XXXXX-XXXXX-XXXXX
Didn’t get a product key? Contact Microsoft or your seller for support.
Once you enter your product key, click Continue.
Step 5.
Next, you need to read and agree to the Microsoft Software License Terms. You can simply do this by reading and reviewing the terms, then ticking the box next to I accept the terms of this agreement and simply click Continue.
Step 6.
Follow the on-screen prompts and wait for Office 2010 to finish installing. This might take longer depending on your system; make sure not to turn off your computer or interrupt the installer by closing it, as progress will be lost and you will have to start the installation over. Once the installation is complete, click Close to exit the setup wizard.
Step 7.
Next, you need to activate your product. In the Microsoft Office Activation Wizard, click the option that says I want to activate the software over the Internet and follow the on-screen instructions.
Activating your Office 2010 is what makes you be able to utilize the software to its fullest. If you decided not to activate after installing, you can always activate from any Office 2010 product by navigating to File, Help, then Activate Product Key. You can check our guide on how to install Office on Windows PC here.
If you’re looking for a software company you can trust for its integrity and honest business practices, look no further than SoftwareKeep. We are a Microsoft Certified Partner and a BBB Accredited Business that cares about bringing our customers a reliable, satisfying experience on the software products they need. We will be with you before, during, and after all the sales.
That’s our 360 Degree SoftwareKeep Guarantee. So, what are you waiting for? Call us Today on +1 877 315 1713 or email sales@softwarekeep.com. As well, you can reach us via Live Chat.