
Microsoft Word is perhaps the most appealing application out of the entire Office lineup. Providing users with hundreds of helpful and useful tools, Word has millions of active users every single day. However, even some regulars don’t utilize these 5 hidden Word features you didn’t know existed.
As Word is accessible to all sorts of people, creating professional documents with only a few clicks is easy. You can take this many steps further by becoming a power user and learning more about some of the advanced features Word offers.
Important Word Functions
Let's dive deeper than the Home and Insert tabs and learn about some hidden gems in the Ribbon toolbar.
1. The clipboard panel
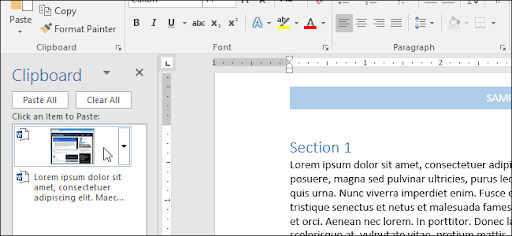
Copying and pasting text and elements such as images is common for frequent computer users. It’s so common that many of us do it mindlessly. Did you know you can handle, store, and insert multiple things from your clipboard in Word? Yes, this is possible by using the Clipboard panel feature.
By default, Word stores your most recent 24 clipboard entries, rotating older entries out with new additions to your clipboard. This allows you to insert more things from your clipboard and become more organized with your work in Word Settings.
To open the Clipboard panel, click on the Home menu, and then click the Clipboard dialogue box launcher in the bottom right corner. Double-click the image or text you want to paste into your document.
2. Remove backgrounds from images
You don’t need an advanced image editor to remove background from images. In fact, you don’t need an image editor at all! Word has a built-in function to remove image backgrounds for you, only keeping the parts of an image you want. This is a wonderful tool for creating professional images, focusing on nothing but the subject.
The background removal tool is already pretty intelligent and advanced. It’s able to detect backgrounds and often doesn’t need any manual corrections. However, you can always adjust what parts you want to remove or keep using the manual drawing tools provided in the removal tool.
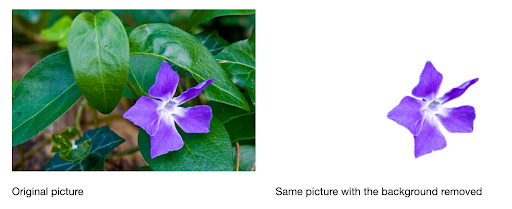
(Source: Microsoft)
To get started, insert an image into your Word document and select it. Afterward, the Picture Format tab should appear in your Ribbon. Here, all you have to do is click on the Remove Background button. The areas that will be removed will have a purple overlay on them, indicating that the space marked will become transparent.
You can refine the selection using the Mark Areas to Keep and Mark Areas to Remove tools.
3. Insert a screenshot
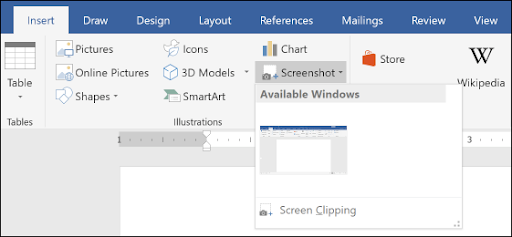
(Source: HTG)
Adding a screenshot could be extremely useful in your Word documents. Once again, you don’t have to use an image editor to crop screenshots — you don’t even have to save a screenshot on your computer! Word has an integrated feature that allows you to grab a screenshot from any window you have open, then insert it into Word.
This saves you from having to save each file individually and makes the process of inserting screenshots much faster. To access this feature, click on the Insert tab from the Ribbon and the Screenshot drop-down menu. Here, you’ll see a list of all open windows to screenshot.
You can also use the included Screen Clipping tool to select only a section of your screen.
4. Integrated translator

(Source: MUO)
Have you ever worked on a project that required you to write in or read an unknown foreign language? You'd most likely take the paragraphs into an online translator and use it to understand the language properly. If you said yes, you’re totally doing it wrong.
Microsoft Word has an integrated translator that can simultaneously translate your words, sentences, paragraphs, or even entire documents. This spares you the time needed to copy and paste text from Word into online translators.
To access this feature, you must switch to the Review tab in the Ribbon, then click on Translate. Choose whichever option you prefer, and voila! Your document just became more accessible for foreign readers, or even yourself.
5. Hide the Ribbon interface

(Source: CW)
Of course, the Ribbon is one of your primary means of navigating around Word. There are still some circumstances where you might want to hide it from your screen temporarily. For example, if you want full focus on typing up a document, hiding the Ribbon from your sight might eliminate some distractions.
Hiding the Ribbon can indeed help you become more productive. One of the fundamental principles of productivity is the focus. In our 5 Tips to Boost Your Productivity article, we discussed the importance of cutting down on multitasking. By hiding the Ribbon, you can hide all the things you’ll need to format your document later, allowing your mind to separate looks from the content.
Simply press the Ctrl + F1 keyboard shortcut to hide or show the Ribbon.
Final thoughts
We hope that this article was able to help you learn more about Microsoft Word and just how powerful of a tool it is. Return to our page anytime you need further guidance regarding Microsoft’s word-processing app.
If you want to read more modern technology articles, consider subscribing to our newsletter. We regularly publish tutorials, news articles, and guides to help you in your day-to-day tech life.
Editors Recomended Articles
» 7 Microsoft Word Hacks You Need to Know
» How to Collaborate In Microsoft Word
» Google Docs vs. Microsoft Word: Which One Is Suitable for You?
» What’s New in Office 2021: Everything You Need To Know
» An Insanely Simple Way To Improve Productivity With Microsoft Word
» Top 14 Microsoft Word Tricks and Tips that you Should Know