To further enhance their famous operating system, Microsoft replaced the infamous Internet Explorer browser with a new, better one: Microsoft Edge. However, many users remain skeptical about the browser’s abilities and would like to disable it on their Windows 10 system. In this article, you can learn how to disable or remove Microsoft Edge.

Jump to Solution
- Method 1. Change your default browser
- Method 2. Uninstall Microsoft Edge
- Method 3. Rename the Edge folder
- Method 4. Disable Edge using PowerShell
Method 1. Change your default browser
One of the easiest ways of disabling Microsoft Edge is simply changing your default browser to another browser installed on your device. This will make it so links and some files viewed in a browser will automatically open in your desired application instead of defaulting to Microsoft Edge.
Before proceeding with this method, ensure your desired web browser is installed on your device.

- Open the Settings app by clicking on the gear icon in the Start menu. Alternatively, you can open the app by pressing down the Windows and I keys on your keyboard.
- Click on the Apps tile. Here, switch to the Default Apps tab using the menu in the left side pane.
- Scroll down until you see the Web browser heading. If Microsoft Edge is listed here, you can change it by clicking on its icon and picking a different browser from the Choose an app context menu.
- After picking a different browser, your computer will automatically open links and various files using that browser and stop using Microsoft Edge for these purposes.
Method 2. Uninstall Microsoft Edge
It’s possible to uninstall Microsoft Edge using the regular method for removing applications from a few devices. Most Windows 10 operating systems have Edge as a built-in function, but several users have reported that they can in fact uninstall Edge the regular way.
- Open the Settings app by clicking on the gear icon in the Start menu. Alternatively, you can open the app by pressing down the Windows and I keys on your keyboard.
-
Click on the Apps tile. Here, switch to Apps & Features from the left-side panel. You should see a list of applications currently installed on your computer that are detectable by Windows 10.
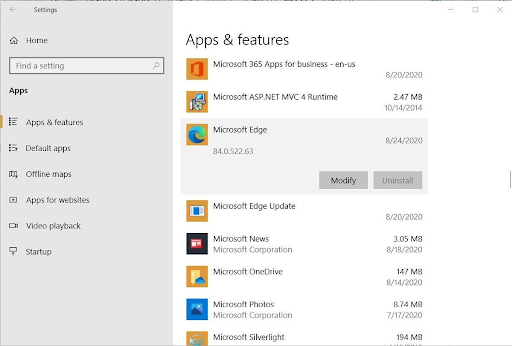
- Locate and select Microsoft Edge by clicking on it once. Now, you can click on the Uninstall button.
- Click the Uninstall button again to confirm your choice and wait for Windows 10 to remove Microsoft Edge from your computer. Once the installation succeeds, you should no longer be able to see Edge on your computer.
Method 3. Rename the Edge folder
If you’re unable to uninstall Microsoft Edge the regular way, you can still disable it using the steps below. This method renames Microsoft Edge’s folder in an attempt to stop its functionality, essentially disabling it from running on your device until the folder is restored.
- Press the Windows + R keys on your keyboard. This is going to bring up the Run utility.
- Type in “C:\Windows\SystemApps” without the quotation marks, and press the Enter key on your keyboard. This will launch the File Explorer and direct you to a specific system folder.
- Locate the Microsoft.MicrosoftEdge_8wekyb3d8bbwe folder. Right-click on it, and select Rename from the context menu.
- Type in a new name for the folder, such as Microsoft.MicrosoftEdge_8wekyb3d8bbwe_Old and hit the Enter key on your keyboard. This way, you can always restore Microsoft Edge if needed.
- After the change, Microsoft Edge should no longer be able to run on your computer, essentially rendering the application disabled.
Method 4. Disable Edge using PowerShell
The PowerShell is a function in Windows 10 that allows you to run advanced system commands. Using this, you’re able to disable Microsoft Edge by executing various lines of commands in the right order.
Warning: The guide below is strongly recommended for advanced Windows 10 users only. Using PowerShell may cause damage to your system if not used correctly. If you’re unsure about using this application, get in touch with an expert.
- Open the Search option in your taskbar and type in PowerShell. Right-click on the application from the results and choose Run as administrator. If prompted by the User Account Control (UAC), click Yes to allow the app to launch.
- Need help? Check out our How to make a local user an administrator in Windows 10 guide.
-
Type in the following command line, then press the Enter key on your keyboard to execute it: get-appxpackage *edge*
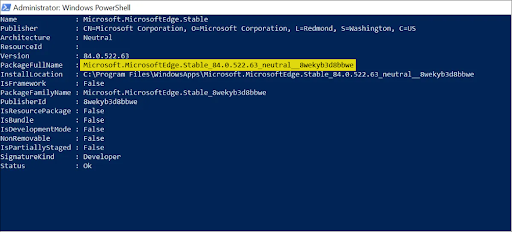
- Find the value named PackageFullName, and copy the value beside it as shown on the image above.
-
Next, type in remove-appxpackage then paste the value you just copied. The full code should look like the example shown above. Press the Enter key to execute the command.
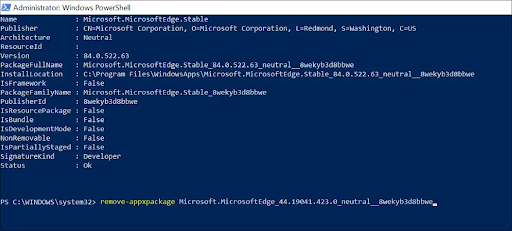
- PowerShell will carry out the process and remove Microsoft Edge from your computer.
Final thoughts
If you need any further help, don’t be afraid to reach out to our customer service team, available 24/7 to assist you. Return to us for more informative articles all related to productivity and modern day technology!
Would you like to receive promotions, deals, and discounts to get our products for the best price? Don’t forget to subscribe to our newsletter by entering your email address below! Receive the latest technology news in your inbox and be the first to read our tips to become more productive.
Also Read
> How to Disable Skype on Windows 10 (5 Methods)
> How to Disable Windows 10's Tabs From Showing in Alt+Tab View
> How to Disable Click-to-Run in Microsoft Office
> How to Disable Hardware Acceleration on Windows 10